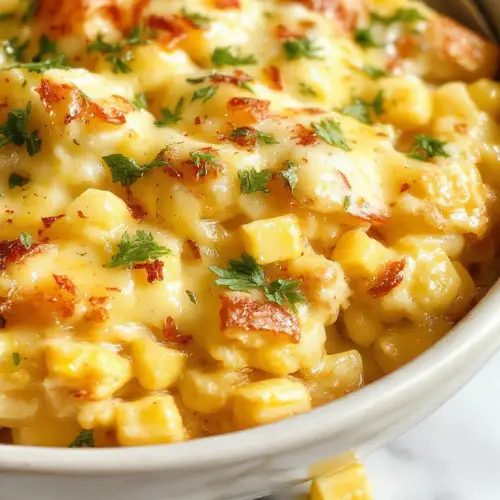
Cheesy Garlic Butter Corn on the Cob: A Savory Delight for Your Taste Buds 🌽🧄🧀✨
1. Introduction: Discover the Magic of Cheesy Garlic Butter Corn on the Cob
Are you ready to transform ordinary corn on the cob into an extraordinary culinary experience? Our Cheesy Garlic Butter Corn on the Cob recipe is designed to do just that! It’s a flavor explosion, combining the richness of creamy garlic butter with the irresistible pull of melted cheese. Imagine sinking your teeth into sweet, juicy corn, coated in a savory blend that’s both comforting and exciting. Perfect for summer barbecues where you can also serve it as a side dish with our dinner recipes, family dinners, or even a simple weeknight treat, this dish is guaranteed to become a family favorite. This recipe isn’t just about cooking; it’s about creating memorable moments around the table. So, let’s dive into this step-by-step guide and learn how to make the best Cheesy Garlic Butter Corn on the Cob you’ve ever tasted. Looking for something sweet after this wonderful meal? Check out our dessert recipes!
2. Ingredients: The Key to Perfect Cheesy Garlic Butter Corn
To make the most delectable Cheesy Garlic Butter Corn on the Cob, you’ll need the following fresh, high-quality ingredients. Each component plays a vital role in building layers of flavour that will tantalize your taste buds. Don’t skimp on quality – it makes a difference! You may buy the ingredients from the store or grow them yourself if you have a garden. If you don’t have fresh ingredients available, you can always use frozen ones. But it will certainly make a huge difference if you use freshly picked ingredients in this recipe.
- 4 ears of corn, husked and cleaned: Opt for fresh, plump ears of corn for the best sweetness.
- 4 tablespoons unsalted butter: Using unsalted butter allows you to control the saltiness of the dish and highlight the other flavors
- 4 cloves of garlic, minced: Freshly minced garlic provides a robust, aromatic base for the butter.
- 1 cup shredded cheese (cheddar or mozzarella): Cheddar offers a sharp, tangy flavor, while mozzarella provides a mild, creamy melt. Feel free to also explore different cheese such as parmesan and provolone.
- ¼ cup fresh parsley, chopped: Fresh parsley adds a vibrant, herbaceous note that complements the richness of the butter.
- Salt and pepper to taste: Seasoning is crucial to balance and enhance all the flavors.
- Optional: chili flakes for added heat: A pinch of chili flakes can add a subtle kick for those who enjoy a bit of spice. Consider also other herbs as alternatives to chili flakes.
3. Step-by-Step Instructions: Crafting Your Cheesy Garlic Butter Corn Masterpiece
Follow these detailed instructions to create the perfect Cheesy Garlic Butter Corn on the Cob, ensuring every bite is packed with flavor and cooked to perfection. Preparation is key to achieving the best results, so read through each step before you begin. Make sure to also check out other Cheesy Garlic Butter Corn on the Cob recipes for different methods and variations!
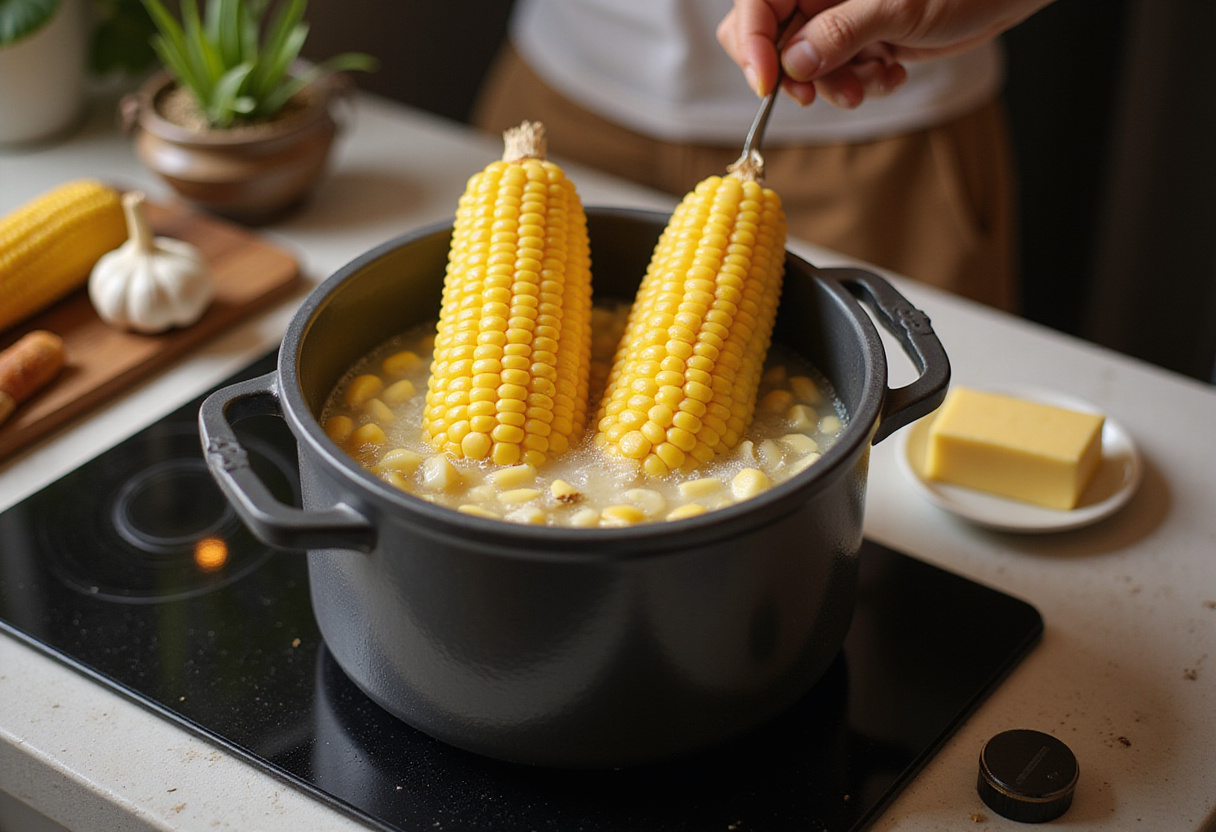
Step 1: Boil the Corn to Sweet Perfection
Begin by filling a large pot with water and bringing it to a rolling boil. Once boiling, carefully add the husked and cleaned corn. Cook for approximately 8-10 minutes, or until the corn is tender and slightly softened. The goal is to cook the corn through without making it mushy. This method ensures the kernels are juicy and plump, ready to absorb the delicious garlic butter. If you are looking for a simple recipe, this Cheesy Garlic Butter Corn is certainly for you!
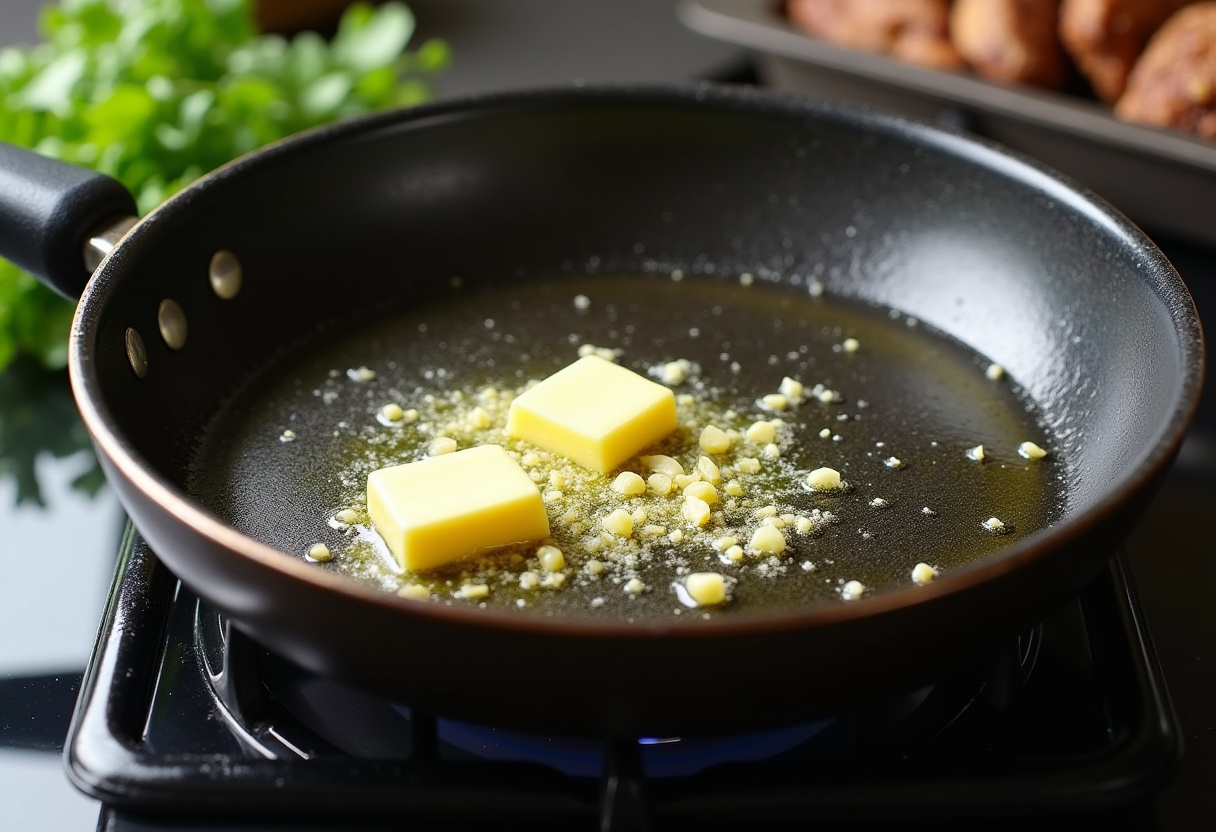
Step 2: Prepare the Aromatic Garlic Butter Infusion
While the corn is boiling, it’s time to create the heart of the dish: the garlic butter. In a saucepan over medium heat, melt the unsalted butter. Once melted, add the minced garlic and sauté for about 1-2 minutes, until fragrant and lightly golden. Be careful not to burn the garlic, as this will make it bitter. The fragrant garlic infuses the butter, creating a rich, savory base that will coat the corn beautifully. You may also add additional herbs that you like. If you like breakfast meal, you can check out our other breakfast meals and recipes!
Step 3: Generously Brush the Corn with Garlic Butter
Once the corn is cooked, carefully remove it from the pot and allow it to cool slightly, just enough to handle without burning yourself. Using a basting brush, generously coat each ear of corn with the fragrant garlic butter mixture. Make sure to get into all the nooks and crannies, ensuring every kernel is infused with that delicious garlic flavor. This step is crucial for maximizing the flavor impact of the Cheesy Garlic Butter Corn on the Cob.

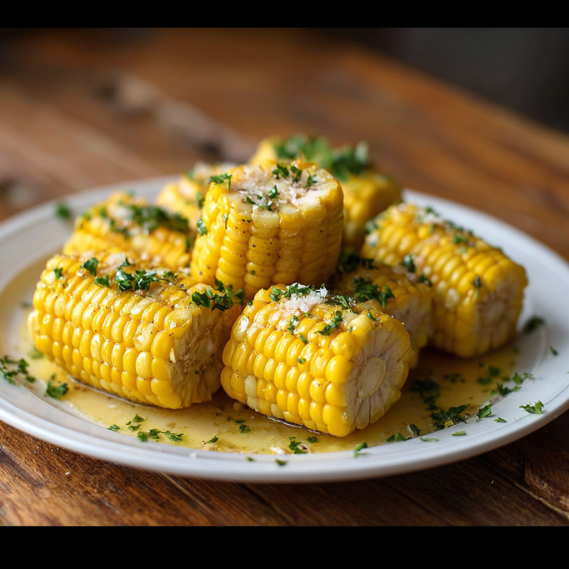
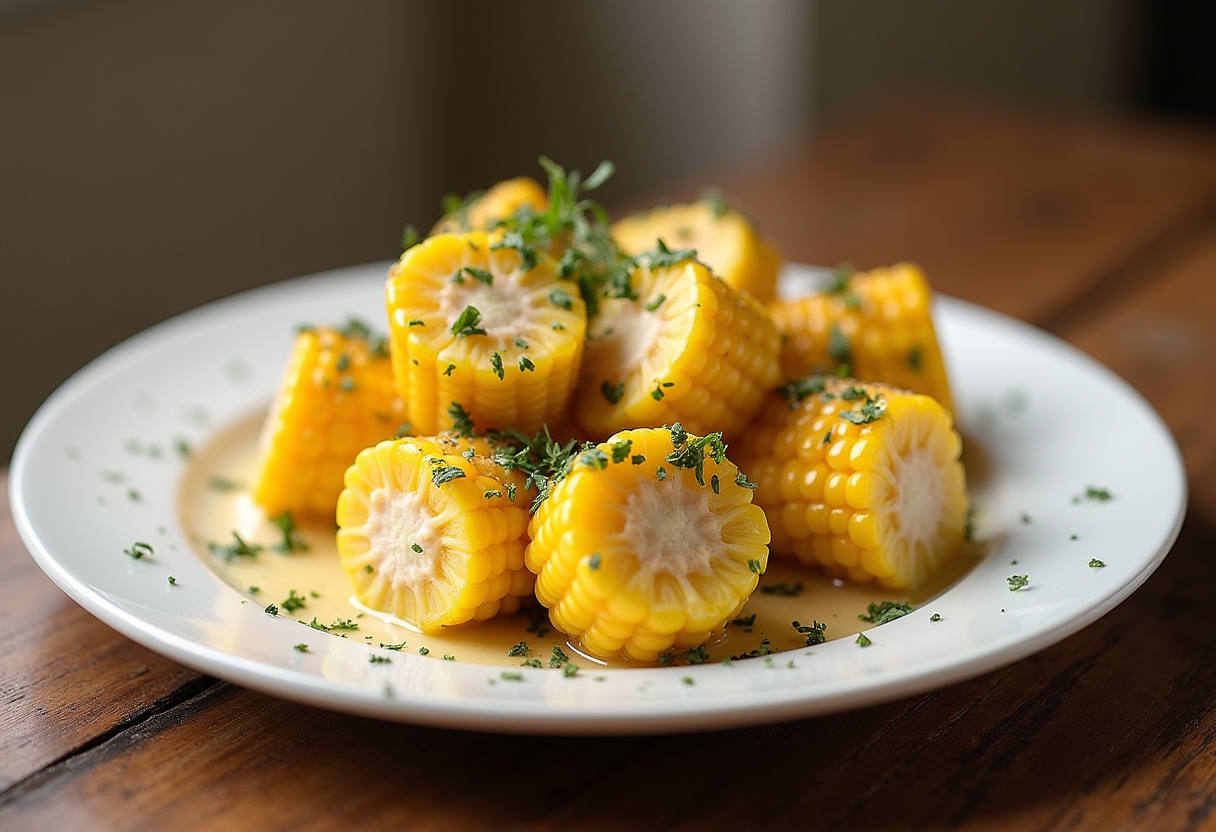
Step 4: Add Cheese, Bake, and Watch the Magic Happen
Preheat your oven to 400°F (200°C). Place the buttered corn on a baking dish, ensuring they are not overcrowded. Sprinkle the shredded cheese evenly over each cob, followed by the chopped fresh parsley. If you’re feeling adventurous, add a pinch of chili flakes for a hint of spice. Bake in the preheated oven for approximately 10 minutes, or until the cheese is melted, bubbly, and lightly golden. The cheese melts into every gap creating a beautiful and tasty meal. Keep a close eye on the corn to prevent the cheese from burning. The baking process melds all the flavors together, creating a truly irresistible Cheesy Garlic Butter Corn on the Cob.

4. Storage Tips: Keeping Your Cheesy Garlic Butter Corn Fresh
If you happen to have any leftover Cheesy Garlic Butter Corn on the Cob (which is unlikely!), proper storage is essential to maintain its flavor and texture. Allow the corn to cool completely before storing. Place the leftover corn in an airtight container and store it in the refrigerator for up to 3 days. To reheat, you can microwave it in 30-second intervals until warmed through, or bake it in a preheated oven at 350°F (175°C) for about 5-10 minutes. Make sure to check out our about us page to learn more about our recipe recommendations!
5. Serving Suggestions: Elevating Your Meal with Cheesy Garlic Butter Corn
This versatile Cheesy Garlic Butter Corn on the Cob is the perfect addition to a wide range of meals. It pairs beautifully with grilled meats such as steak, chicken, or ribs. It’s also a fantastic side dish for summer salads, seafood, or even vegetarian dishes. For a fun twist, try serving it at your next BBQ or potluck – it’s guaranteed to be a hit! Garnish with extra parsley or a sprinkle of parmesan cheese for an added touch of elegance. You can check out our other Lunch recipes for your consideration.
6. FAQs: Your Questions About Cheesy Garlic Butter Corn Answered
Here are some frequently asked questions to help you perfect your Cheesy Garlic Butter Corn on the Cob recipe:
Can I use frozen corn for this recipe?
Absolutely! While fresh corn is ideal, frozen corn can be a convenient alternative. Just make sure to thaw and drain it well before proceeding with the recipe to remove any excess water. The flavor might be slightly less intense, but it will still be delicious. Frozen corn is a great option if fresh corn is not in season or readily available.
What cheese works best for Cheesy Garlic Butter Corn on the Cob?
The choice of cheese is a matter of personal preference. Cheddar cheese provides a sharp, tangy flavor that complements the sweetness of the corn. Mozzarella cheese offers a mild, creamy melt that’s perfect for those who prefer a more subtle flavor. Experiment with different cheeses to find your favorite combination. Other options include Parmesan, Monterey Jack, or even a blend of cheeses for a more complex flavor profile.
Can I make this recipe vegan?
Yes, you can easily adapt this recipe to be vegan-friendly. Substitute the butter with a plant-based butter alternative, such as coconut oil or vegan butter sticks. For the cheese, use a vegan cheese alternative of your choice. There are many great vegan cheese options available that melt well and provide a similar texture to dairy cheese. With these simple substitutions, you can enjoy a delicious vegan version of Cheesy Garlic Butter Corn on the Cob. For other alternative recipes, you may visit this website.
7. Conclusion: Savor the Irresistible Flavor of Cheesy Garlic Butter Corn on the Cob
Our Cheesy Garlic Butter Corn on the Cob recipe is more than just a side dish; it’s a celebration of simple ingredients transformed into a culinary delight. The savory garlic butter, combined with the creamy melted cheese and sweet corn, creates a flavor explosion that will leave you craving more. Whether you’re hosting a summer barbecue or looking for a quick and easy weeknight meal, this recipe is sure to impress. So, gather your ingredients, follow our step-by-step instructions, and get ready to enjoy a truly unforgettable corn on the cob experience!
8. Additional Tips: Customizing Your Cheesy Garlic Butter Corn for Extra Flavor
Want to take your Cheesy Garlic Butter Corn on the Cob to the next level? Here are a few additional tips to customize the recipe to your liking. For an extra layer of flavor, try adding herbs like thyme, basil, or oregano to the garlic butter. A squeeze of lemon juice can also brighten up the flavors and add a touch of acidity. Experiment with different cheese blends, such as adding a sprinkle of Parmesan cheese or a dash of pepper jack for a spicy kick. Don’t be afraid to get creative and explore your own flavor combinations!
9. Final Thoughts: Your Go-To Recipe for Cheesy Garlic Butter Corn on the Cob
This easy-to-follow recipe for Cheesy Garlic Butter Corn on the Cob is not only delicious but also brings a comforting feeling with every bite. It’s the perfect way to elevate a simple ear of corn into a gourmet treat. Be sure to keep this recipe close at hand for your next culinary adventure. Enjoy the delightful combination of flavors and textures, and savor the satisfaction of creating a dish that’s both simple and extraordinary. If you want to explore other meals, check out our dinner recipes!
Print
Cheesy Garlic Butter Corn on the Cob
- Total Time: 30 minutes
- Yield: 4 servings 1x
- Diet: Vegetarian
Description
Indulge in the irresistible taste of Cheesy Garlic Butter Corn on the Cob, a savory delight that elevates your summer barbecues and family dinners with its rich flavor and cheesy goodness.
Ingredients
- 4 ears of corn, husked and cleaned
- 4 tablespoons unsalted butter
- 4 cloves of garlic, minced
- 1 cup shredded cheese (cheddar or mozzarella)
- ¼ cup fresh parsley, chopped
- Salt and pepper to taste
- Optional: chili flakes for added heat
Instructions
- Boil a large pot of water and cook the corn for about 8-10 minutes until tender.
- Heat butter in a saucepan over medium heat; add minced garlic and sauté for 1-2 minutes until fragrant.
- Remove corn from pot and let cool; brush generously with garlic butter mixture.
- Place buttered corn in a baking dish, sprinkle with shredded cheese and parsley, and optionally with chili flakes; bake at 400°F (200°C) for about 10 minutes until cheese is melted and bubbly.
Notes
- Leftover corn can be stored in an airtight container in the refrigerator for up to 3 days.
- Reheat in the microwave or oven until warmed through.
- For a vegan option, use plant-based butter and vegan cheese.
- Prep Time: 10 minutes
- Cook Time: 20 minutes
- Category: Side Dish
- Method: Baking
- Cuisine: American
Nutrition
- Serving Size: 1 ear of corn
- Calories: 220 Kcal
- Sugar: 3g
- Sodium: 150mg
- Fat: 14g
- Saturated Fat: 8g
- Unsaturated Fat: 4g
- Trans Fat: 0g
- Carbohydrates: 24g
- Fiber: 3g
- Protein: 6g
- Cholesterol: 35mg